
Guide
How to Create a Plugin for Dashibase
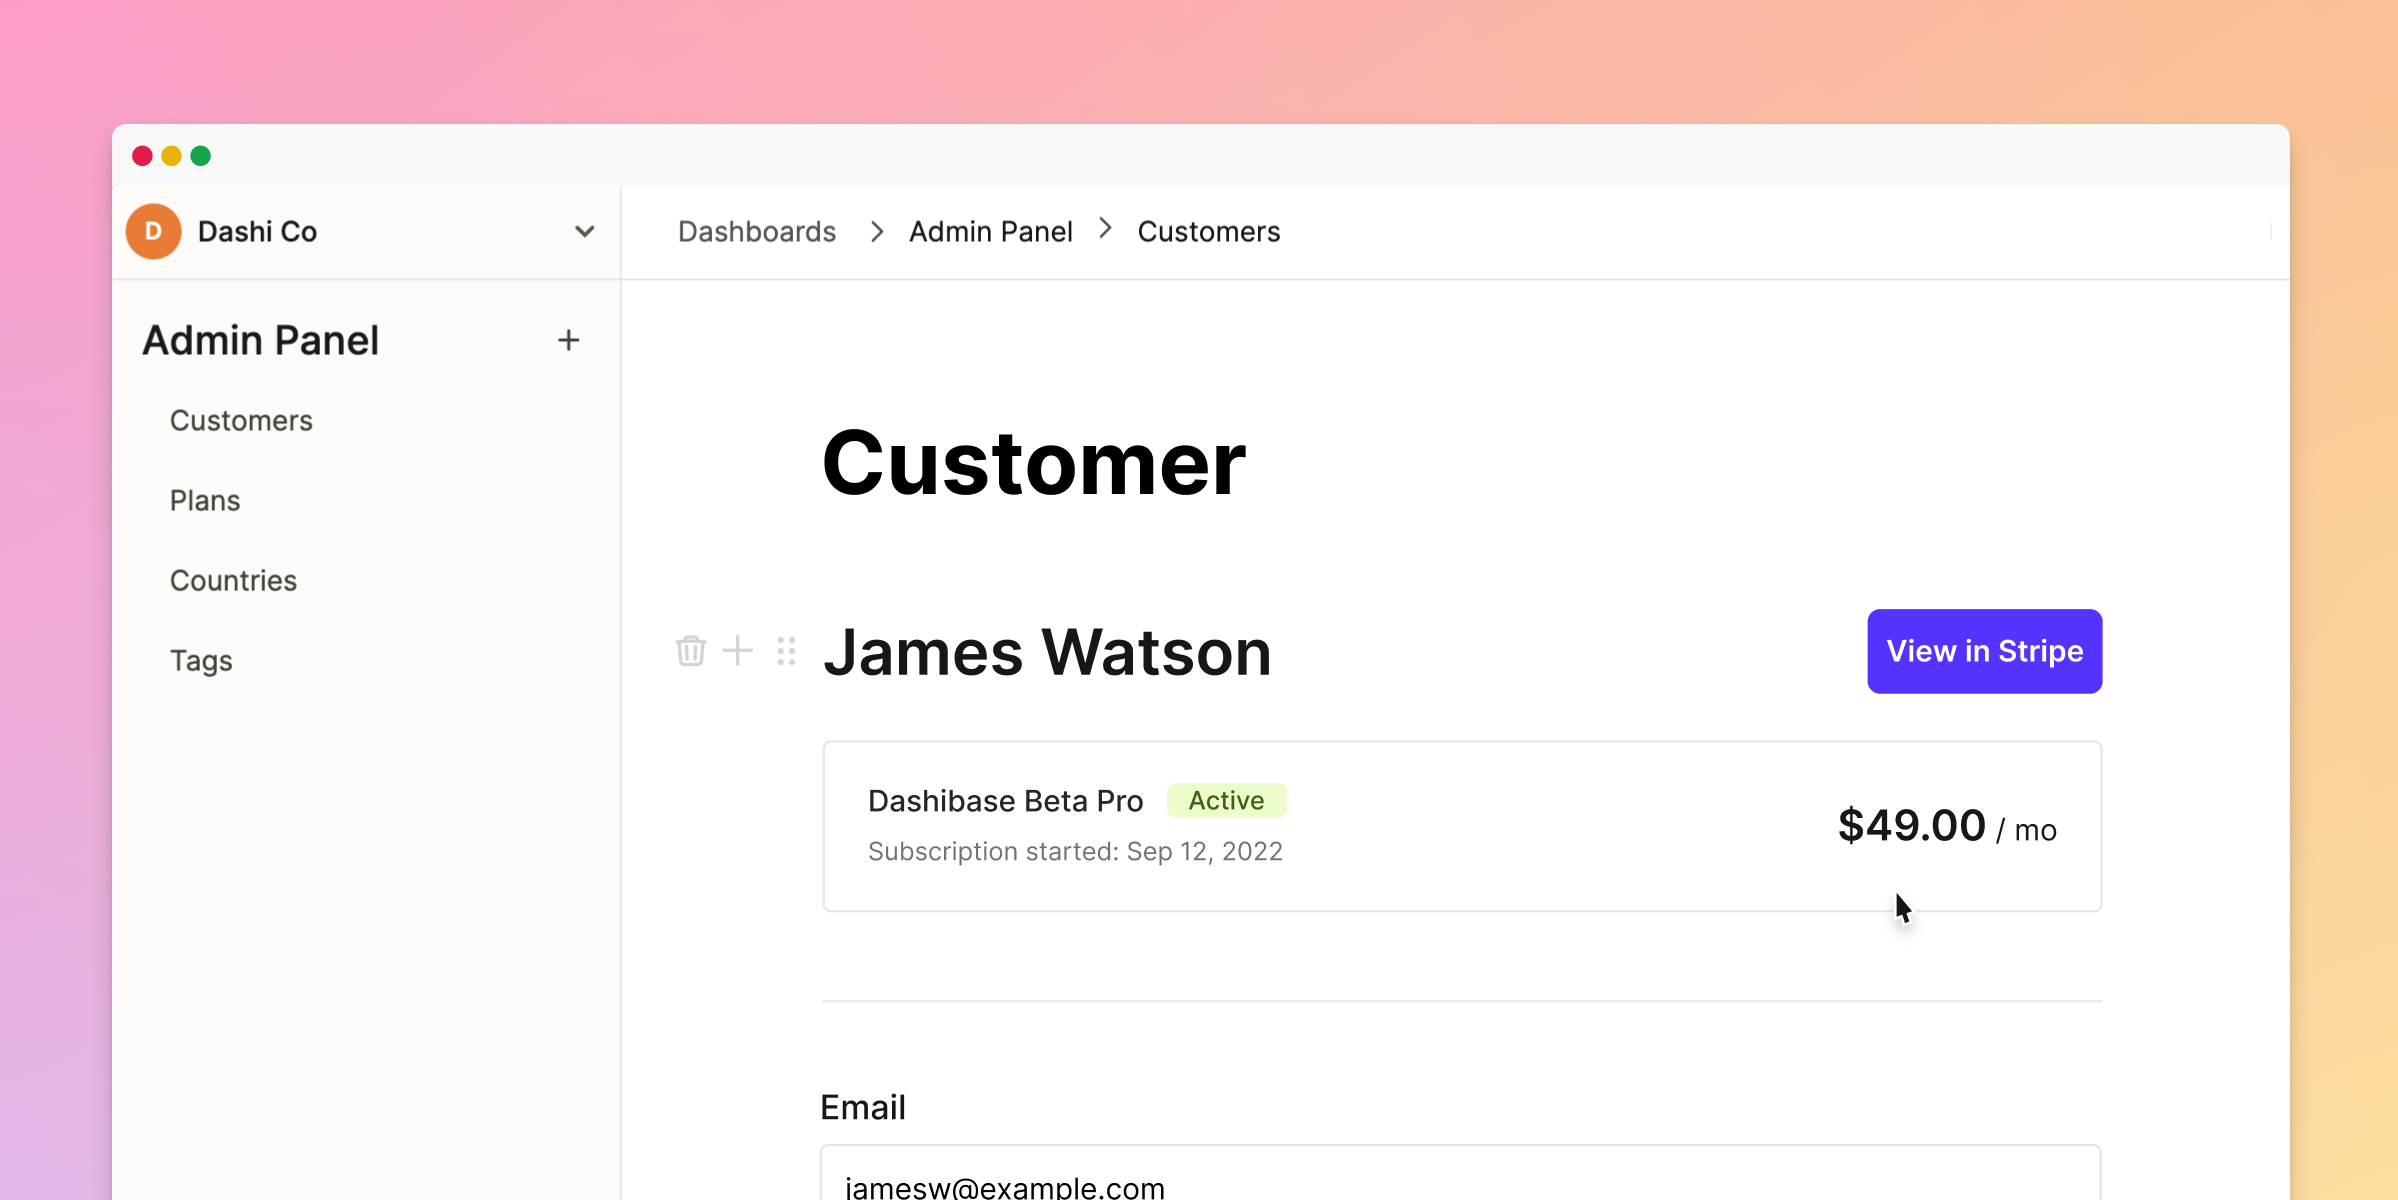
With the release of the Dashibase PluginClient npm package, developers can now create custom plugins for extending their dashboards. In this tutorial we will go over the basic steps for building one! We are going to build a Stripe customer plugin that displays the customer information corresponding to the customer ID stored in one of our tables.
Basic steps for building a plugin
In order for plugins to work seamlessly, it needs to communicate with Dashibase using the @dashibase/plugin-client package, following a specific flow of event-response type messaging. The npm package makes this very simple and we will go over them shortly!
But, in general, plugins should follow the events as shown below for the setup stage:
- Initialize
PluginClient - Handle plugin setup by passing a callback function to
onSetupmethod ofPluginClient - Send
SETUPrequest to Dashibase
After plugin setup, developers can utilize our API to implement their custom business logic.
Before we begin
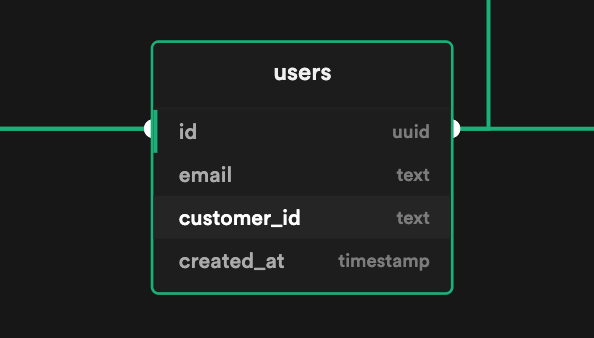
This plugin is intended to be used within a single item view for displaying external data from Stripe. We assume that you have a database with a users table or something similar that holds the corresponding Stripe customer IDs.
In this example, we are mostly focused on a table named users which has a column customer_id which stores the Stripe customer IDs.
Building the plugin
Initialize a Next.js app with TypeScript and Tailwind CSS
- Let’s quickly setup a Next.js project for our plugin.
npx create-next-app@latest --ts dashibase-stripe-customer-plugin
cd dashibase-stripe-customer-plugin- We’re using Tailwind CSS to quickly style our components. Install Tailwind CSS for the Next.js project.
- Install
@dashibase/plugin-clientand Headless UI
npm install @dashibase/plugin-client @headlessui/react- Now we need to save the Stripe secret key as an environment variable. Add the following to your .env file. You can get the key from your Stripe dashboard.
STRIPE_SECRET_KEY=YOUR_STRIPE_SECRET_KEYDropdown component
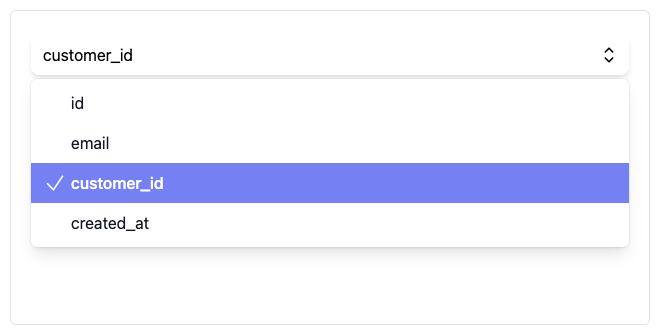
After receiving the SETUP message, we show a dropdown containing a list of columns that are accessible through Dashibase. Users can select the column that contains the Stripe customer IDs.
import { columnIdOption } from '../pages'import { Dispatch, Fragment, SetStateAction } from 'react'import { Listbox, Transition } from '@headlessui/react'type Props = { options: columnIdOption[]; columnId: columnIdOption; setColumnId: Dispatch<SetStateAction<columnIdOption>>;}export default function Dropdown({ options, columnId, setColumnId }:Props) { return ( <div> <Listbox value={columnId} onChange={setColumnId}> <div className="relative mt-1"> <Listbox.Button className="relative w-full py-2 pl-3 pr-10 text-left bg-white rounded-lg shadow-md cursor-default focus:outline-none focus-visible:border-indigo-500 focus-visible:ring-2 focus-visible:ring-white focus-visible:ring-opacity-75 focus-visible:ring-offset-2 focus-visible:ring-offset-orange-300 sm:text-sm"> <span className="block truncate">{columnId.name}</span> <span className="absolute inset-y-0 right-0 flex items-center pr-2 pointer-events-none"> <svg xmlns="http://www.w3.org/2000/svg" fill="none" viewBox="0 0 24 24" strokeWidth={1.5} stroke="currentColor" className="w-6 h-6"> <path strokeLinecap="round" strokeLinejoin="round" d="M8.25 15L12 18.75 15.75 15m-7.5-6L12 5.25 15.75 9" /> </svg> </span> </Listbox.Button> <Transition as={Fragment} leave="transition ease-in duration-100" leaveFrom="opacity-100" leaveTo="opacity-0" > <Listbox.Options className="absolute z-10 w-full py-1 mt-1 overflow-auto text-base text-left bg-white shadow-lg max-h-60 rounded-md ring-1 ring-black ring-opacity-5 focus:outline-none sm:text-sm"> {options.map((columnId, idx) => ( <Listbox.Option key={idx} className={({ active }) => `relative cursor-default select-none py-2 pl-10 pr-4 ${ active ? 'bg-indigo-400 text-white' : 'text-gray-900' }` } value={columnId} > {({ selected }) => ( <> <span className={`block truncate ${ selected ? 'font-medium' : 'font-normal' }`} > {columnId.name} </span> {selected ? ( <span className="absolute inset-y-0 left-0 flex items-center pl-3 text-white"> <svg xmlns="http://www.w3.org/2000/svg" fill="none" viewBox="0 0 24 24" strokeWidth={1.5} stroke="currentColor" className="w-6 h-6"> <path strokeLinecap="round" strokeLinejoin="round" d="M4.5 12.75l6 6 9-13.5" /> </svg> </span> ) : null} </> )} </Listbox.Option> ))} </Listbox.Options> </Transition> </div> </Listbox> </div> )}CustomerInfo component

This component simply shows the customer’s name and allows dashboard users to view more information from Stripe’s dashboard.
export default function CustomerInfo({ customer }) { return ( <div className="flex items-center justify-between py-4 rounded"> <div> <p className="text-3xl font-semibold"> {customer.name ? customer.name : "Stripe customer"} </p> </div> <a href={`https://dashboard.stripe.com/customers/${customer.id}`} target="_blank" rel="noopener"> <button className="px-3 py-2 text-sm text-white bg-indigo-500 rounded"> View in Stripe </button> </a> </div> )}Subscriptions component
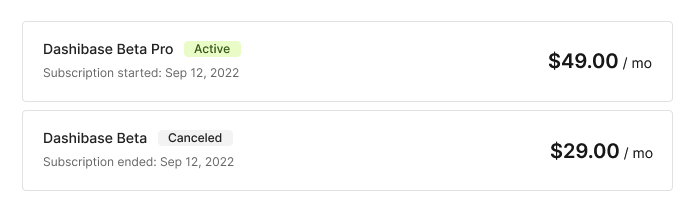
The Subscriptions component is used to render a list of subscriptions for a particular Stripe customer. It shows several subscription-specific information at a glance like the subscription name, plan, status, etc.
import { getCurrencySymbol, getInterval, getTime } from '../utils/functions'export default function Subscriptions({ subscriptions }) { return ( <> {subscriptions.length ? ( <> { subscriptions.map(s => ( <div className="flex items-center justify-between px-4 py-3 mb-2 border border-gray-200 rounded" key={s.id} > <div> <div className="flex items-center mb-1"> <p className="text-base"> {s.plan.product.name} </p> <span className={`ml-3 px-2 ${s.status === 'active' ? 'bg-lime-100 text-lime-700' : 'bg-neutral-200 text-neutral-500'} rounded text-xs`}> {s.status.charAt(0).toUpperCase() + s.status.slice(1)} </span> </div> {s.status === 'canceled' ? ( <p className="text-sm text-gray-400"> {`Subscription ended: ${getTime(s.ended_at*1000)}`} </p> ) : ( <p className="text-sm text-gray-400"> {`Subscription started: ${getTime(s.start_date*1000)}`} </p> )} </div> <SubscriptionPlan subscription={s} /> </div> )) } </> ) : ( <p className="font-light text-neutral-400">No subscription.</p> )} </> )}function SubscriptionPlan({ subscription }) { return ( <p className="pb-1 text-base font-normal"> <span className="text-xl font-semibold"> {`${getCurrencySymbol(subscription.plan.currency)} ${(subscription.plan.amount/100).toFixed(2)}`} </span> {` / ${getInterval(subscription.plan.interval)}`} </p> )}// Converts timestamp to Month Day, Year formatexport const getTime = (timestamp: number) => { const date = new Date(timestamp) const months = ["Jan", "Feb", "Mar", "Apr", "May", "Jun", "Jul", "Aug", "Sept", "Oct", "Nov", "Dec"] return `${months[date.getMonth()]} ${date.getDate()}, ${date.getFullYear()}` }// Return symbols of popular currenciesexport const getCurrencySymbol = (currency: string) => { const currencySymbols = { 'usd': '$', // US Dollar 'eur': '€', // Euro 'crc': '₡', // Costa Rican Colón 'gbp': '£', // British Pound Sterling 'ils': '₪', // Israeli New Sheqel 'inr': '₹', // Indian Rupee 'jpy': '¥', // Japanese Yen 'krw': '₩', // South Korean Won 'ngn': '₦', // Nigerian Naira 'php': '₱', // Philippine Peso 'pln': 'zł', // Polish Zloty 'pyg': '₲', // Paraguayan Guarani 'thb': '฿', // Thai Baht 'uah': '₴', // Ukrainian Hryvnia 'vnd': '₫', // Vietnamese Dong }; if (currencySymbols[currency]) { return currencySymbols[currency]; } else { return currency }}// Return shortened intervalexport const getInterval = (interval: string) => { let string = '' switch (interval) { case 'day': string = 'day' break; case 'week': string = 'wk' break; case 'month': string = 'mo' break; case 'year': string = 'yr' break; } return string}Initialize PluginClient
We’re using Next.js for building this plugin, so we need to import PluginClient dynamically on the client-side since it relies on the window object which is only exposed on the browser.
Once PluginClient is initialized, we need to handle plugin setup by passing a callback function to the onSetup method. This is where we will check whether the plugin has already been setup and populate our dropdown with the available columns.
After that we call the init method to tell Dashibase we are ready.
import type { NextPage } from 'next'import { useEffect, useRef } from 'react'import type PluginClient from '@dashibase/plugin-client'const Home: NextPage = () => { const clientInitialized = useRef(false) const client = useRef<PluginClient>() async function importClient () { const PluginClient = (await import('@dashibase/plugin-client')).default client.current = new PluginClient() client.current.onSetup((data) => { // Handle plugin setup }) // Tell Dashibase we are ready client.current.init() } useEffect(() => { if (clientInitialized.current === false) { clientInitialized.current = true importClient() } }, []) return ( <h1>Hello, world</h1> )}export default HomeHandle plugin setup
For the Stripe plugin to function, it needs to know which column of our table holds the Stripe customer ID. We can get this information during the SETUP stage.
When we receive a SETUP message from Dashibase, it contains all the columns that are shown in the single item view on Dashibase along with any information that we have stored.
Inside the onSetup callback function, we check whether stripeColumnId is already stored or not. If it’s not we proceed with setting up the plugin.
This involves displaying a dropdown with a list of columns to choose from. After the column which contains the Stripe customer ID is chosen, we store that particular column name against stripeColumnId key. We need to store this value so that we can skip the setup stage the next time a user visits the dashboard.
async function importClient () { const PluginClient = (await import('@dashibase/plugin-client')).default client.current = new PluginClient() // Setup plugin client.current.onSetup((data) => { if (data.store.stripeColumnId) { // Get stripe customer ID const storedColumnId = data.store.stripeColumnId getStripeCustomerId(storedColumnId) } else { // Show dropdown for plugin setup setSetupRequired(true) if (data.columnIds.length) { setColumnId({ name: data.columnIds[0] }) setOptions(data.columnIds.map(col => ({ name: col }))) } } }) // Tell Dashibase we are ready client.current.init() }Plugin developers don’t need to worry about storing such values. Data can be stored on Dashibase by using the store method provided by PluginClient. After the client is initialized, the plugin receives a SETUP message which contains all the values that are stored by Dashibase.
function handleSave () { // Store Stripe customer ID column client.current.store("stripeColumnId", columnId.name) .then((response) => { const columnId = response.value getStripeCustomerId(columnId) }) }Fetch Stripe customer information
After setting up the plugin and storing the column ID which contains the Stripe customer ID, we send a REQUEST message to Dashibase to get the actual value contained in that column for a single item view.
function getStripeCustomerId (key: string) { client.current.request(key) .then((response) => { const stripeCustomerId = response.value setCustomerId(stripeCustomerId) setSetupRequired(false) }) }When we set the customerId state in React, it triggers a useEffect which sends a request to our Next.js API route to fetch the customer details from Stripe.
import type { NextPage } from 'next'import type PluginClient from '@dashibase/plugin-client'import { useEffect, useRef, useState } from 'react'import Dropdown from '../components/Dropdown'import CustomerInfo from '../components/CustomerInfo'import Subscriptions from '../components/Subscriptions'const Home: NextPage = () => { const clientInitialized = useRef(false) const client = useRef<PluginClient>() const [options, setOptions] = useState<columnIdOption[]>([]) // Store columnIds for populating dropdown const [columnId, setColumnId] = useState<columnIdOption>() // Store column selected by user const [setupRequired, setSetupRequired] = useState(false) // Check whether plugin has finished setup const [customerId, setCustomerId] = useState() const [customer, setCustomer] = useState<any>() const [subscriptions, setSubscriptions] = useState<any>() const [loading, setLoading] = useState(true) const [error, setError] = useState<any>() async function importClient () { const PluginClient = (await import('@dashibase/plugin-client')).default client.current = new PluginClient() // Setup plugin client.current.onSetup((data) => { if (data.store.stripeColumnId) { // Get stripe customer ID const storedColumnId = data.store.stripeColumnId getStripeCustomerId(storedColumnId) } else { // Show dropdown for plugin setup setSetupRequired(true) if (data.columnIds.length) { setColumnId({ name: data.columnIds[0] }) setOptions(data.columnIds.map(col => ({ name: col }))) } } }) // Tell Dashibase we are ready client.current.init() } function handleSave () { client.current.store("stripeColumnId", columnId.name) .then((response) => { const columnId = response.value getStripeCustomerId(columnId) }) } function getStripeCustomerId (key: string) { client.current.request(key) .then((response) => { const stripeCustomerId = response.value setCustomerId(stripeCustomerId) setSetupRequired(false) }) } useEffect(() => { if (clientInitialized.current === false) { clientInitialized.current = true importClient() } }, []) useEffect(() => { if (!customerId) return; setLoading(true) fetch(`/api/customer?customerId=${customerId}`) .then(resp => resp.json()) .then(data => { if (!data.error) { setCustomer(data.customer) setSubscriptions(data.subscriptions) setLoading(false) } else { setError(data.error) } }) }, [customerId]) if (setupRequired) { return ( <div className="z-0 p-5 text-right"> <Dropdown options={options} columnId={columnId} setColumnId={setColumnId} /> <button onClick={handleSave} className="flex items-center px-3 py-1 mt-5 text-sm text-white bg-indigo-400 rounded justify-evenly"> Save </button> </div> ) } if (error) { return ( <div className="h-[100vh] flex items-center text-center bg-red-200"> <div className="w-2/3 p-10 mx-auto text-red-600 border-2 border-red-400 rounded"> <span className="block py-1 mb-4 font-mono text-xs text-white bg-red-600 rounded"> {error.raw.statusCode} </span> <p className="font-semibold"> {error.raw.message} </p> <p className="font-mono text-sm font-light"> {error.raw.code} </p> </div> </div> ) } if (loading) { return ( <div className="p-5 animate-pulse"> <div className="px-5 py-3 mb-5 text-indigo-500 border border-indigo-200 rounded bg-gradient-to-t from-indigo-50" > <div className="h-5 mb-3 bg-indigo-200 rounded" /> <div className="w-2/3 h-5 bg-indigo-100 rounded" /> </div> <div className="flex flex-col justify-center px-5 py-2 mb-2 border border-indigo-200 rounded items" > <div className="flex"> <div className="w-3/5 h-5 mb-3 bg-indigo-200 rounded" /> <div className="w-1/5 h-5 mb-3 ml-3 rounded bg-indigo-50" /> </div> <div className="w-1/3 h-5 mb-1 bg-indigo-100 rounded" /> </div> </div> ) } return ( <div className="px-10 py-5"> <CustomerInfo customer={customer} /> <Subscriptions subscriptions={subscriptions.data} /> </div> )}export default Homeexport interface columnIdOption { name: string}Then in our API, we are simply connecting to Stripe's API and responding to requests with customer and subscription details for a customerId we receive from the frontend.
import type { NextApiRequest, NextApiResponse } from 'next'import Stripe from 'stripe'const stripe = new Stripe(process.env.STRIPE_SECRET_KEY as string, { apiVersion: '2022-08-01'})export default async function handler( req: NextApiRequest, res: NextApiResponse) { const url = new URL(req.url as string, 'http://localhost:3000') const searchParams = new URLSearchParams(url.search) const params = new Proxy(searchParams, { get: (searchParams, prop) => searchParams.get(prop as string), }) const { customerId } = params as any try { const customer = await stripe.customers.retrieve(customerId, { expand: ['sources'] }); const subscriptions = await stripe.subscriptions.list({ customer: customer.id, status: 'all', expand: ['data.plan.product'] }) res.status(200).json({ customer, subscriptions }) } catch (error) { if (error instanceof Stripe.errors.StripeError) { res.status(error.statusCode ? error.statusCode : 400).json({ error }) } }}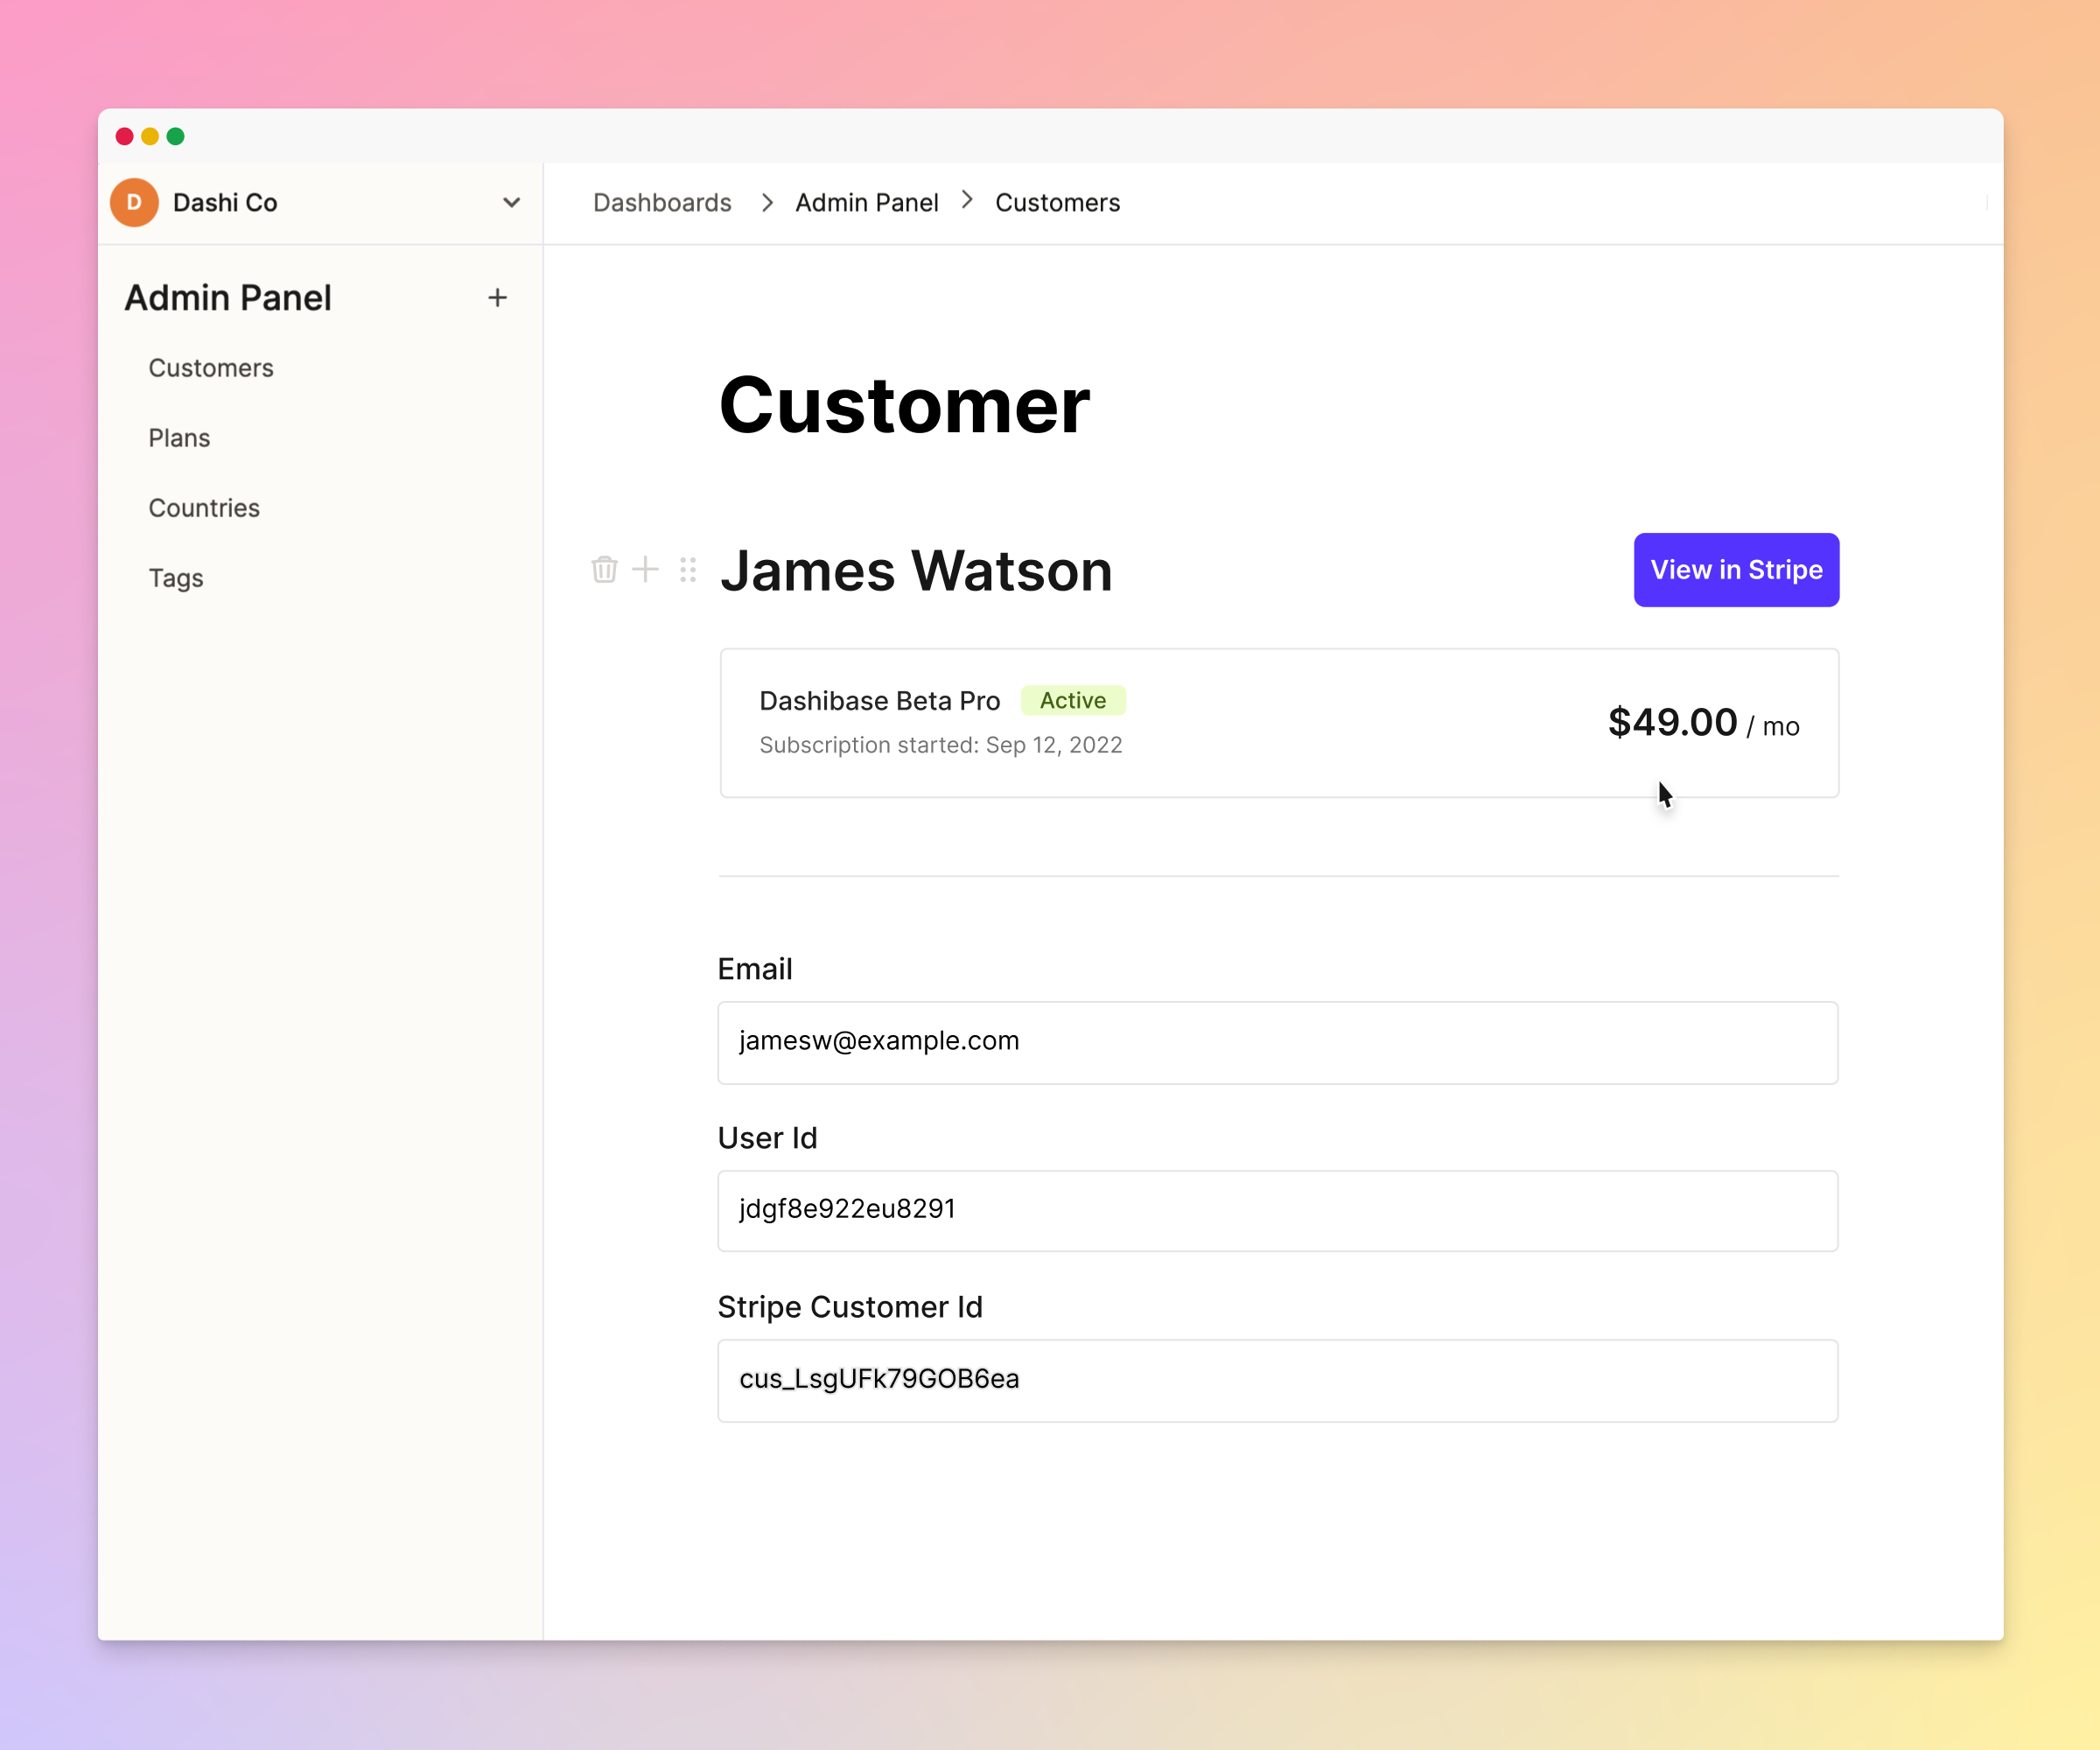
What next?
This tutorial should give you a general idea on how to create plugins for Dashibase and you can find the full code in the accompanying GitHub repository.
A good next step would be to go through the @dashibase/plugin-client docs to take a look at the API and see how you might be able to use it to build your own plugin!
We can’t wait to see what you build!